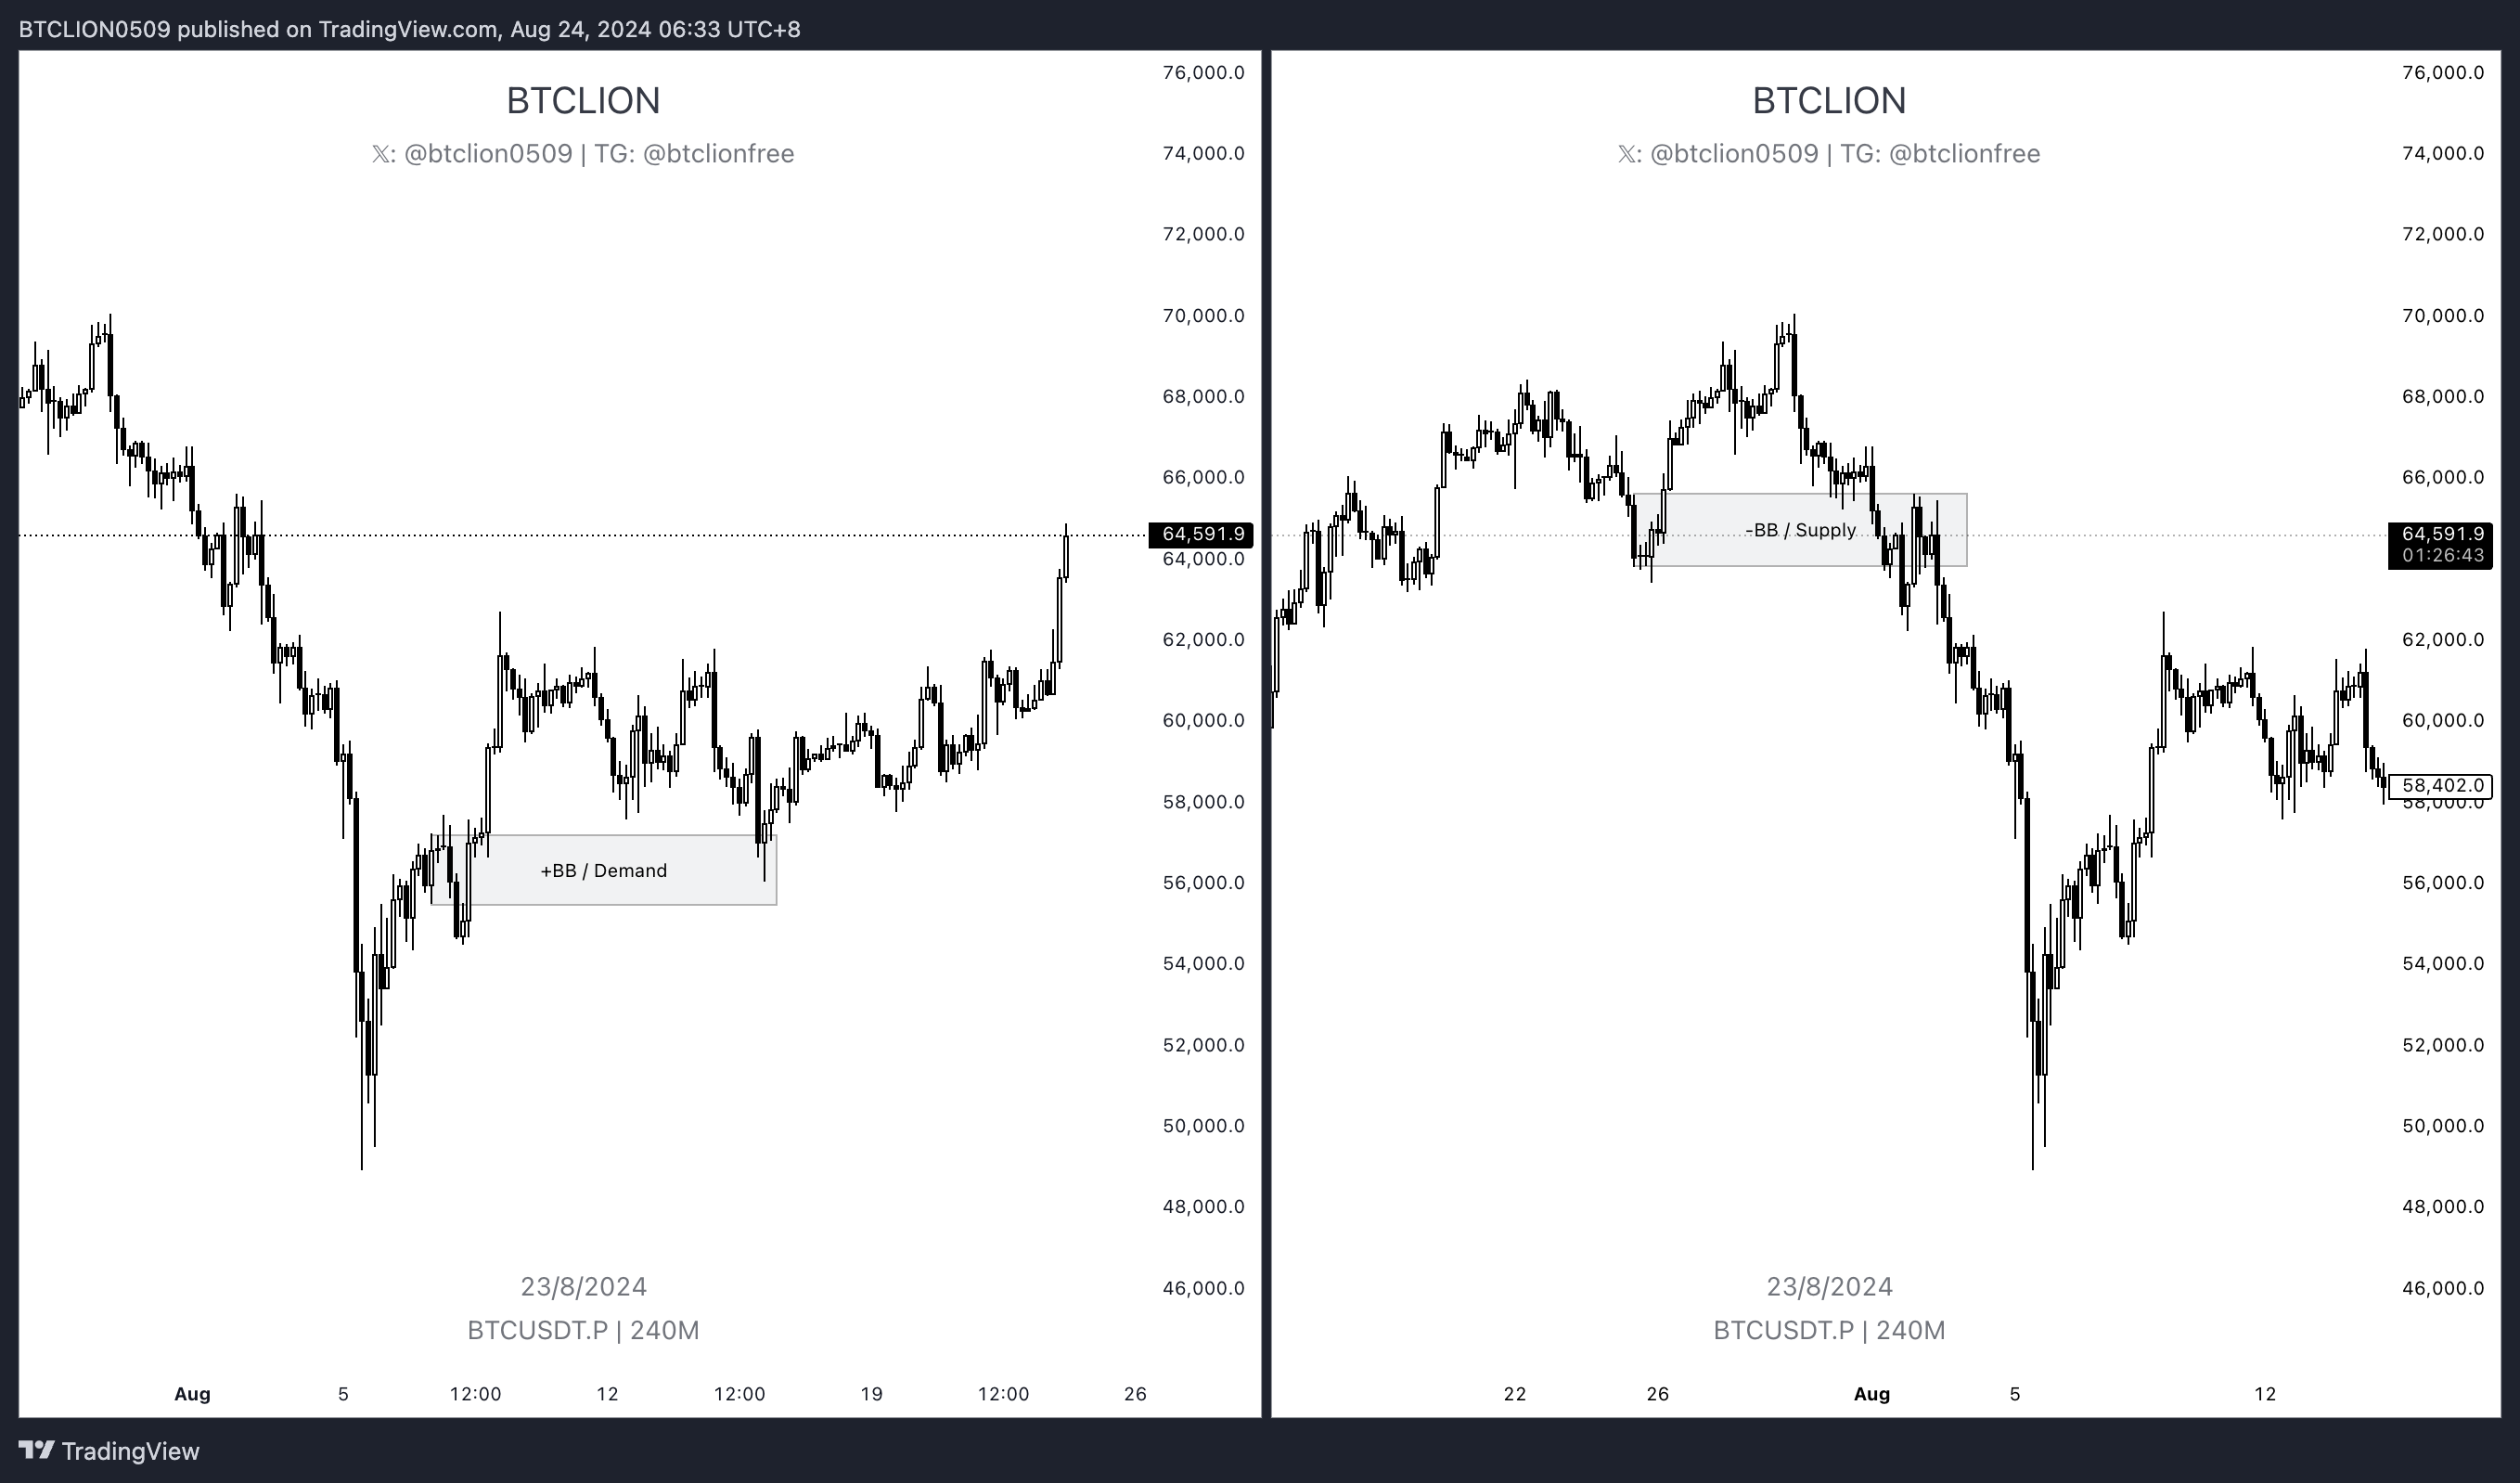
Supply and Demand
We know that every move institutions make can have a major impact on market direction. Therefore, we can try to locate institutional footprints on the chart and profit by following their entry points.
Order Block (OB)
An Order Block (OB) is an area where institutional money or major investors placed significant orders in the market. These areas often mark key turning points or continuation points in price, because institutional capital is large enough that price often forms support or resistance around these zones. The basic way to locate an OB on the chart is as follows:
- After price creates a clear Swing Point, it often reverses and produces a large Displacement.
- At that moment, we can mark the last candle that moved opposite to the direction of price delivery.
- The range formed by that candle is the Order Block we are looking for.
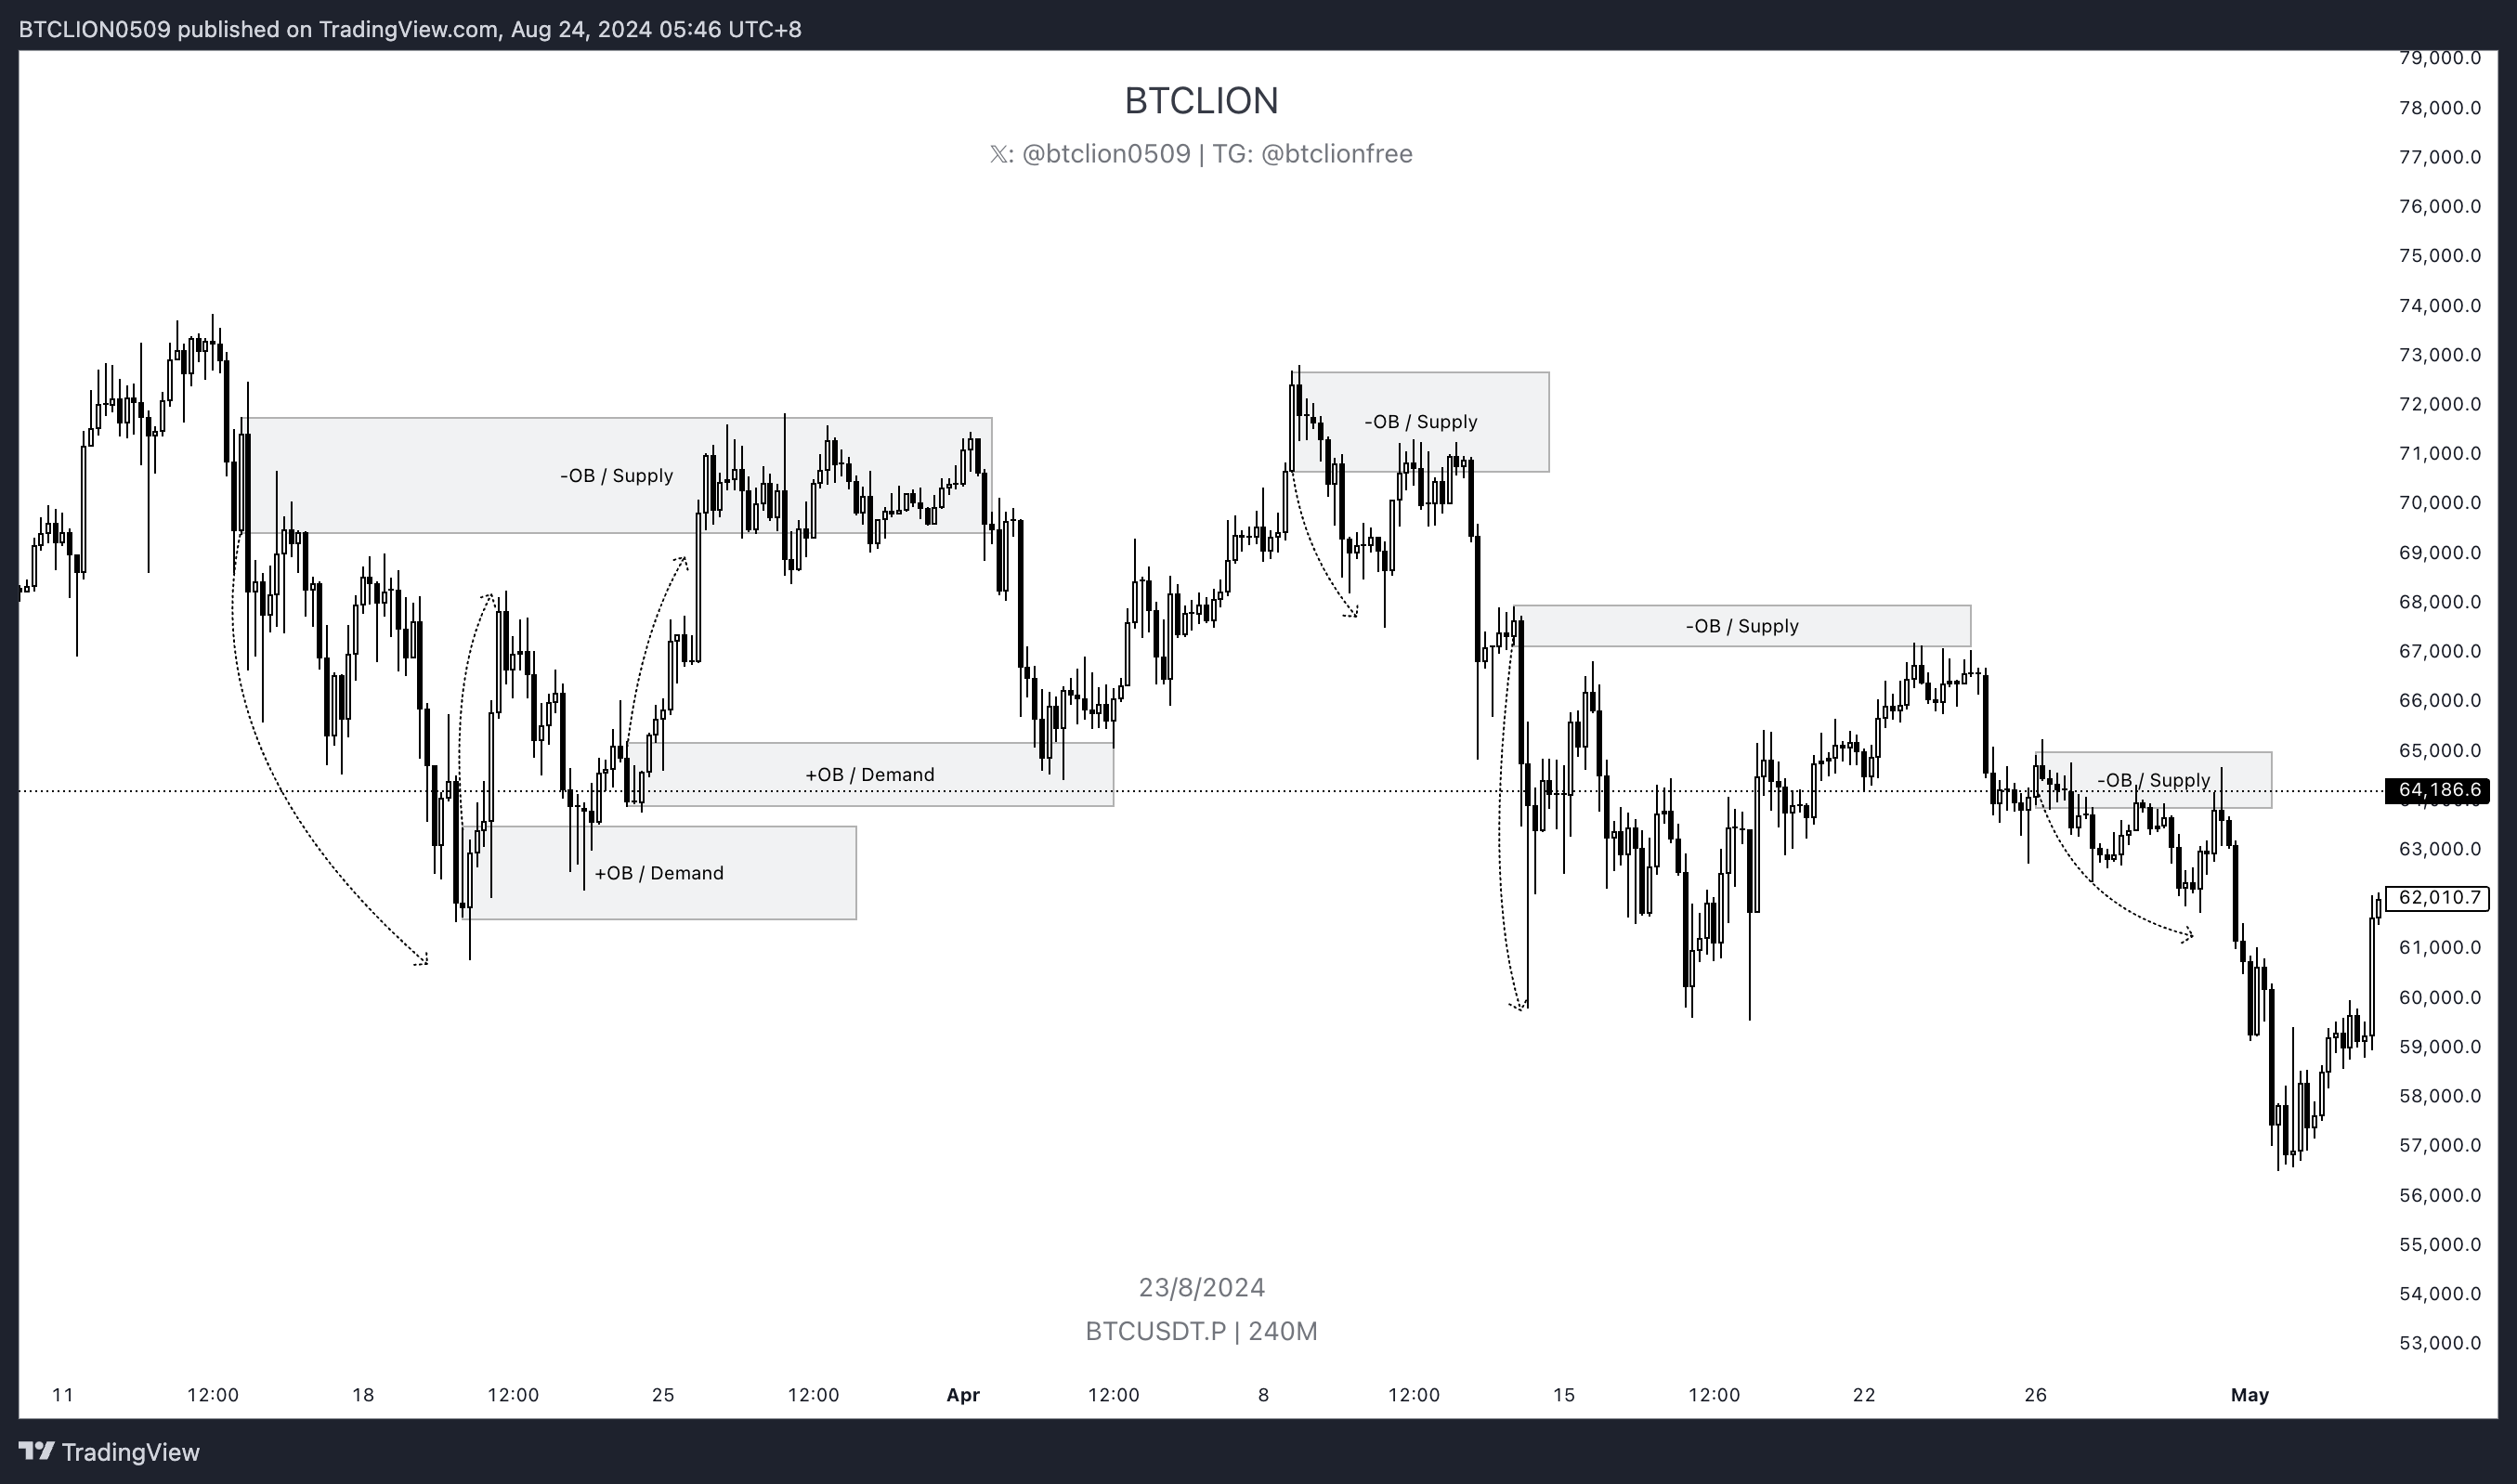
The chart marks each OB and the direction of price delivery it corresponds to. Simply put, after price moves, we find the last opposite-direction candle. That candle is the OB we want.
- A bearish OB can be viewed as a supply zone, while a bullish OB can be viewed as a demand zone.
- There are many ways to draw an OB. Some traders only use the body of the candle and ignore the wick. Others treat a sequence of opposite-direction candles as one entire OB. There is no absolute right or wrong answer. What matters is the price action when price returns to the OB.
- The midpoint of an OB is called the Mean Threshold (MT).
Personally, most of the time I only treat the candle body as the valid range of the order block, unless the body is too small or price returns to the wick area and produces a strong reaction.
The logic behind an order block is as follows: when price moves aggressively, we can view it as Smart Money entering the market at that area. Therefore, the opposite-direction candle before the aggressive move can be seen as manipulation before Smart Money enters. The goal is to push price in the opposite direction, obtain inventory at a relatively favorable price, and then deploy the main position. In that sense, an OB is the footprint Smart Money leaves behind when entering the market. When price returns to the OB, Smart Money attempts to complete the unfilled orders there and push price again.
When price respects an OB and moves away in the opposite direction again, that behavior is called Mitigation.
Although OBs are easy to find and seem easy to use, a truly high-quality OB should satisfy the following three conditions:
- A Liquidity Sweep is completed: this reflects Smart Money manipulation before entry.
- After the OB forms, price produces a large Displacement, ideally with an FVG: this shows Smart Money has truly entered the market.
- The Displacement after the OB forms should ideally also complete an MSS: this further confirms Smart Money participation.
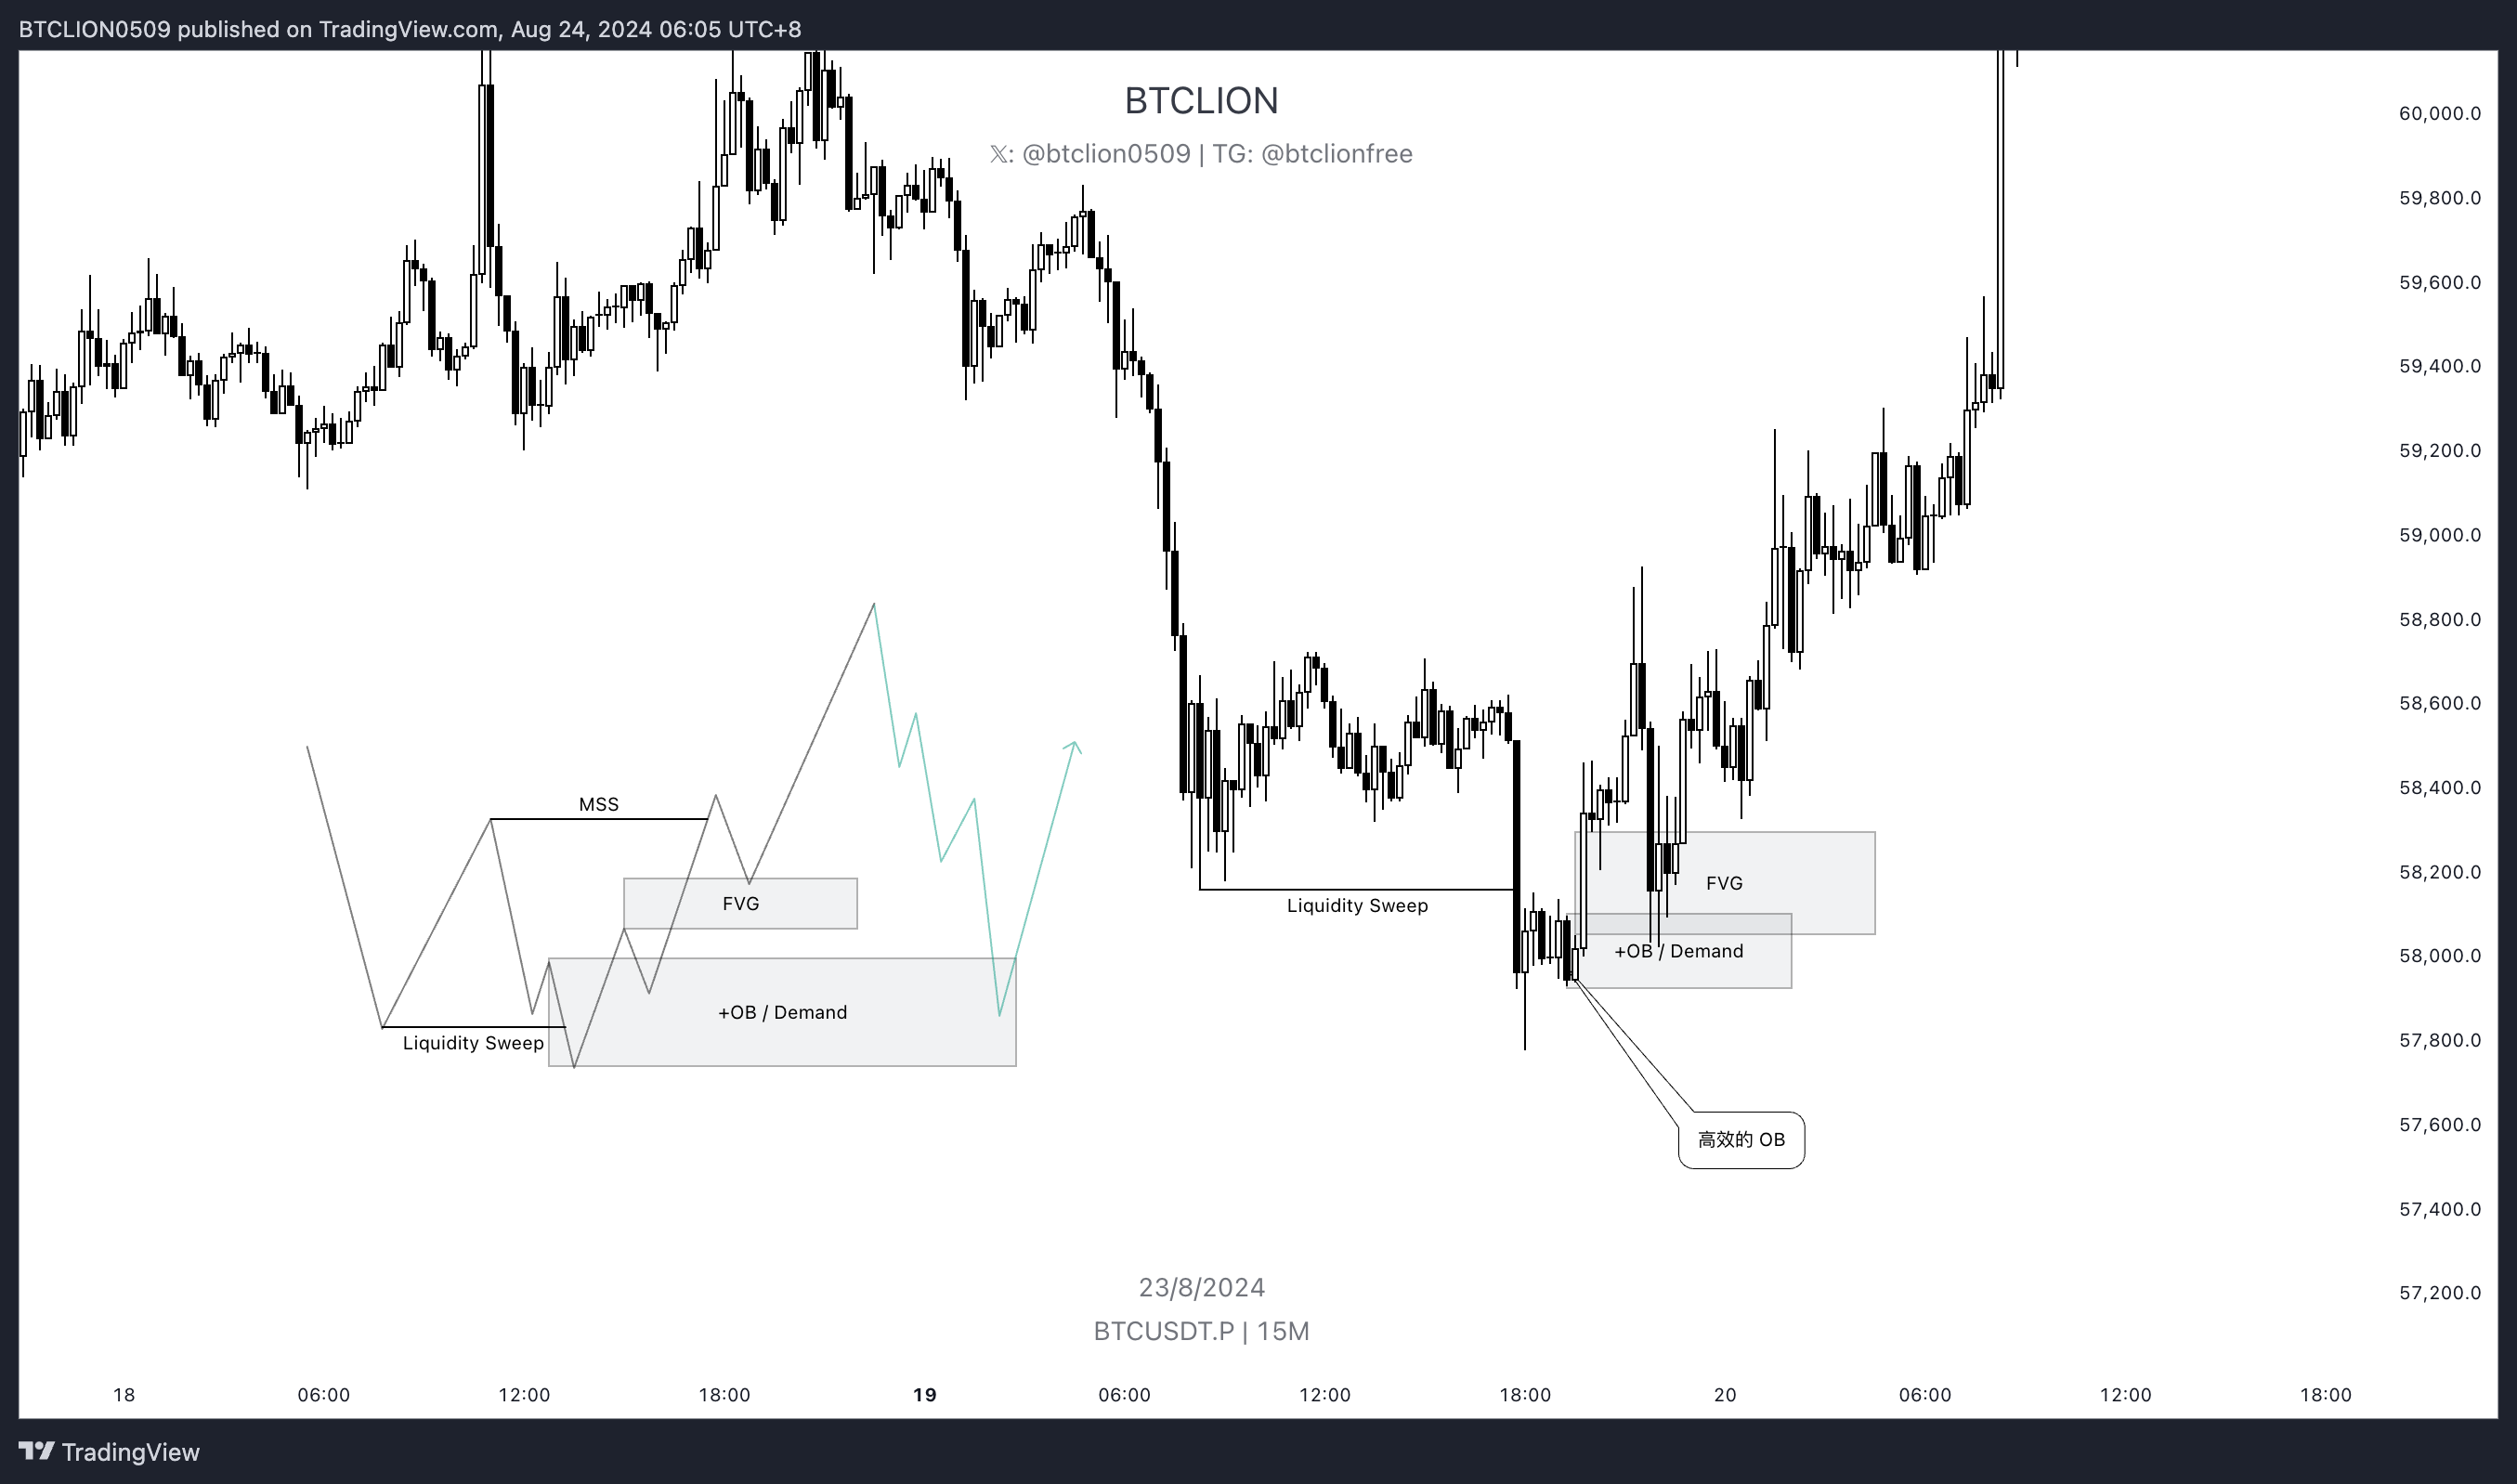
Example of a high-quality OB.
Breaker Block (BB)
When we see an OB form and successfully create an MSS, but that OB is later not respected and price cuts directly through it, the order flow at that area reverses, similar to the relationship between FVG and IFVG. A bullish OB then becomes a bearish OB, and a bearish OB becomes a bullish OB.
The logic behind a Breaker Block is as follows:
- When an order block appears and price completes an MSS, but the OB is not respected, it means that the price delivery was actually false delivery. Its purpose was to lure speculative traders into following the continuation so Smart Money could complete Order Pairing.
- When price breaks through that OB, the true direction of price delivery is revealed. After Smart Money guides price into the real direction of delivery, it needs to recover the cost spent earlier to trap speculative traders.
- Therefore, after price moves in the true direction, it returns to the Breaker Block to recover that cost.
- For trapped speculative traders, this is the only chance to get out. We can also enter while Smart Money is recovering its cost.
Mitigation Block (MB)
The structure and logic of a Mitigation Block are extremely similar to a Breaker Block. The difference is that a Breaker Block comes from a basic order block that produces MSS before being engulfed in the opposite direction, while a Mitigation Block forms when an order block fails to produce MSS and is directly engulfed in the opposite direction after a Failure Swing.
A Failure Swing refers to a move within a trending swing that fails to create a new high or new low with BOS. It can be viewed as a sign that the force driving price is weakening.
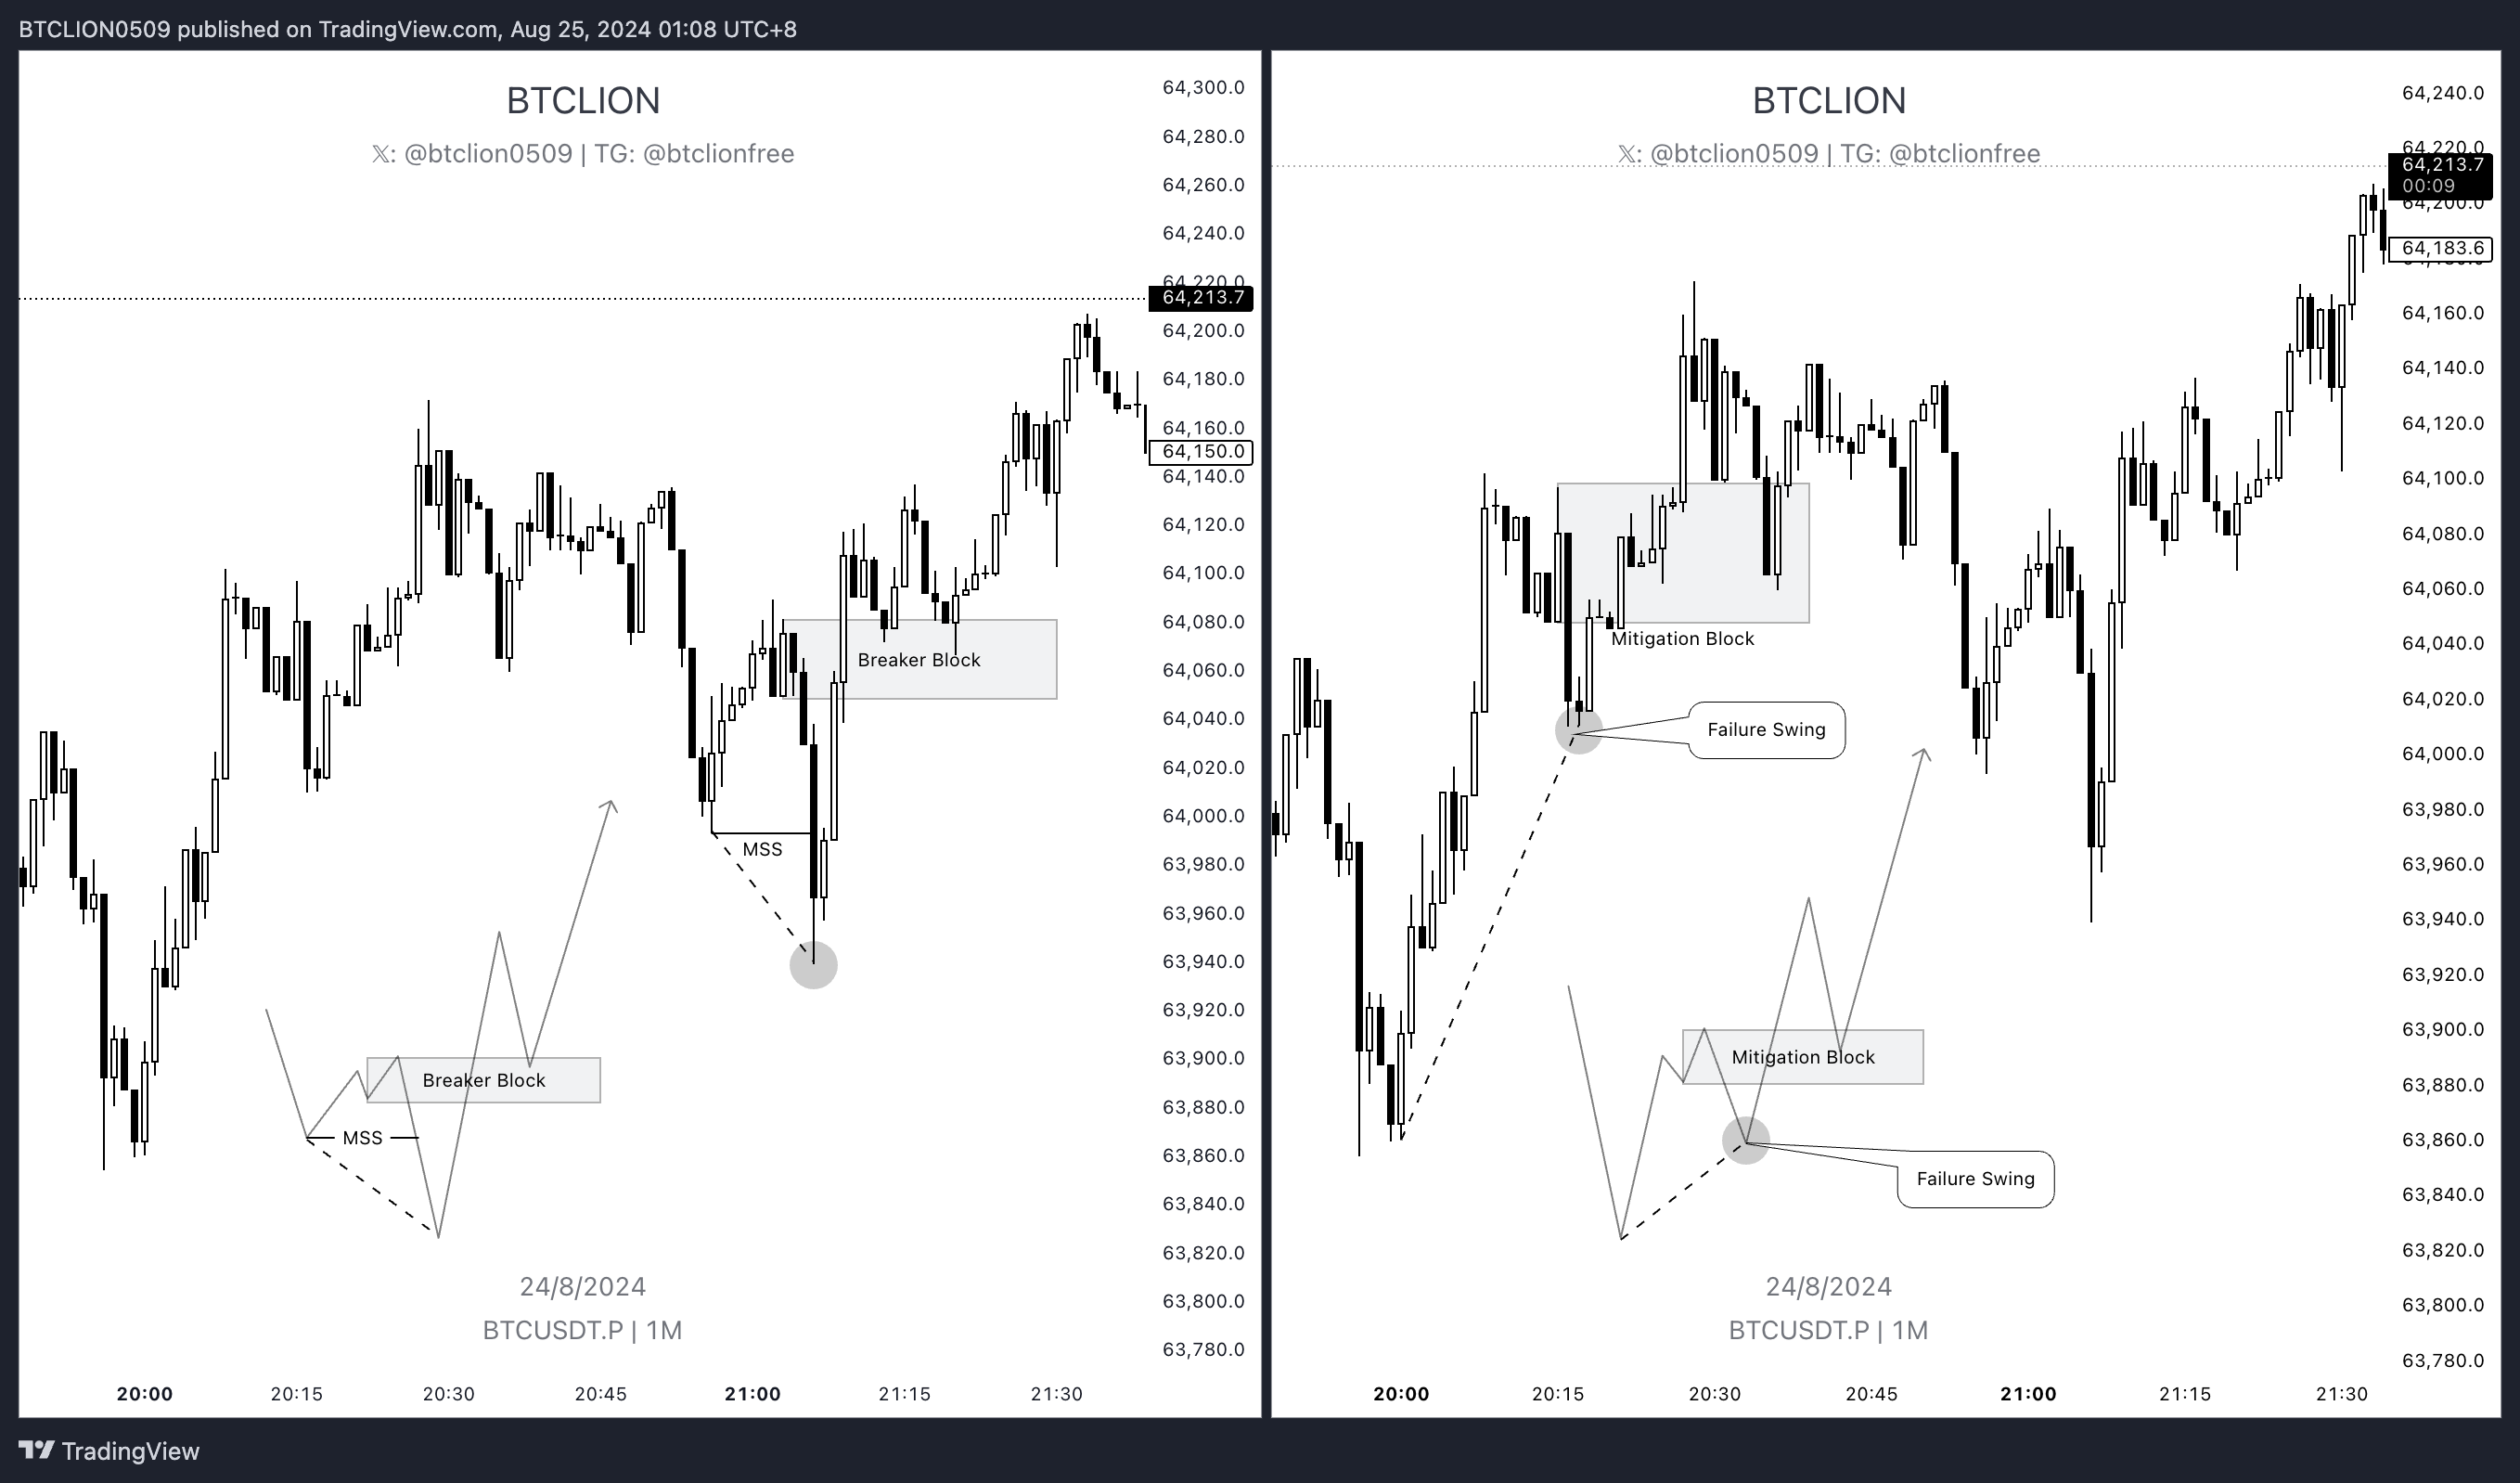
- Mitigation Block and Breaker Block share the same formation logic. The only difference is that a Mitigation Block does not produce MSS before it is broken.
- Wherever a Breaker Block can be used, a Mitigation Block can usually be used as a substitute as well, which will be mentioned later when we discuss entry models. In terms of strength, however, Breaker Block is generally better than Mitigation Block.
Propulsion Block (PB)
When price returns to an order block, reverses, and then immediately creates a new order block, we call the new one a Propulsion Block (PB). A Propulsion Block is also known as an order block inside an order block. When it appears, it can be understood as Smart Money pushing price forward from that area.
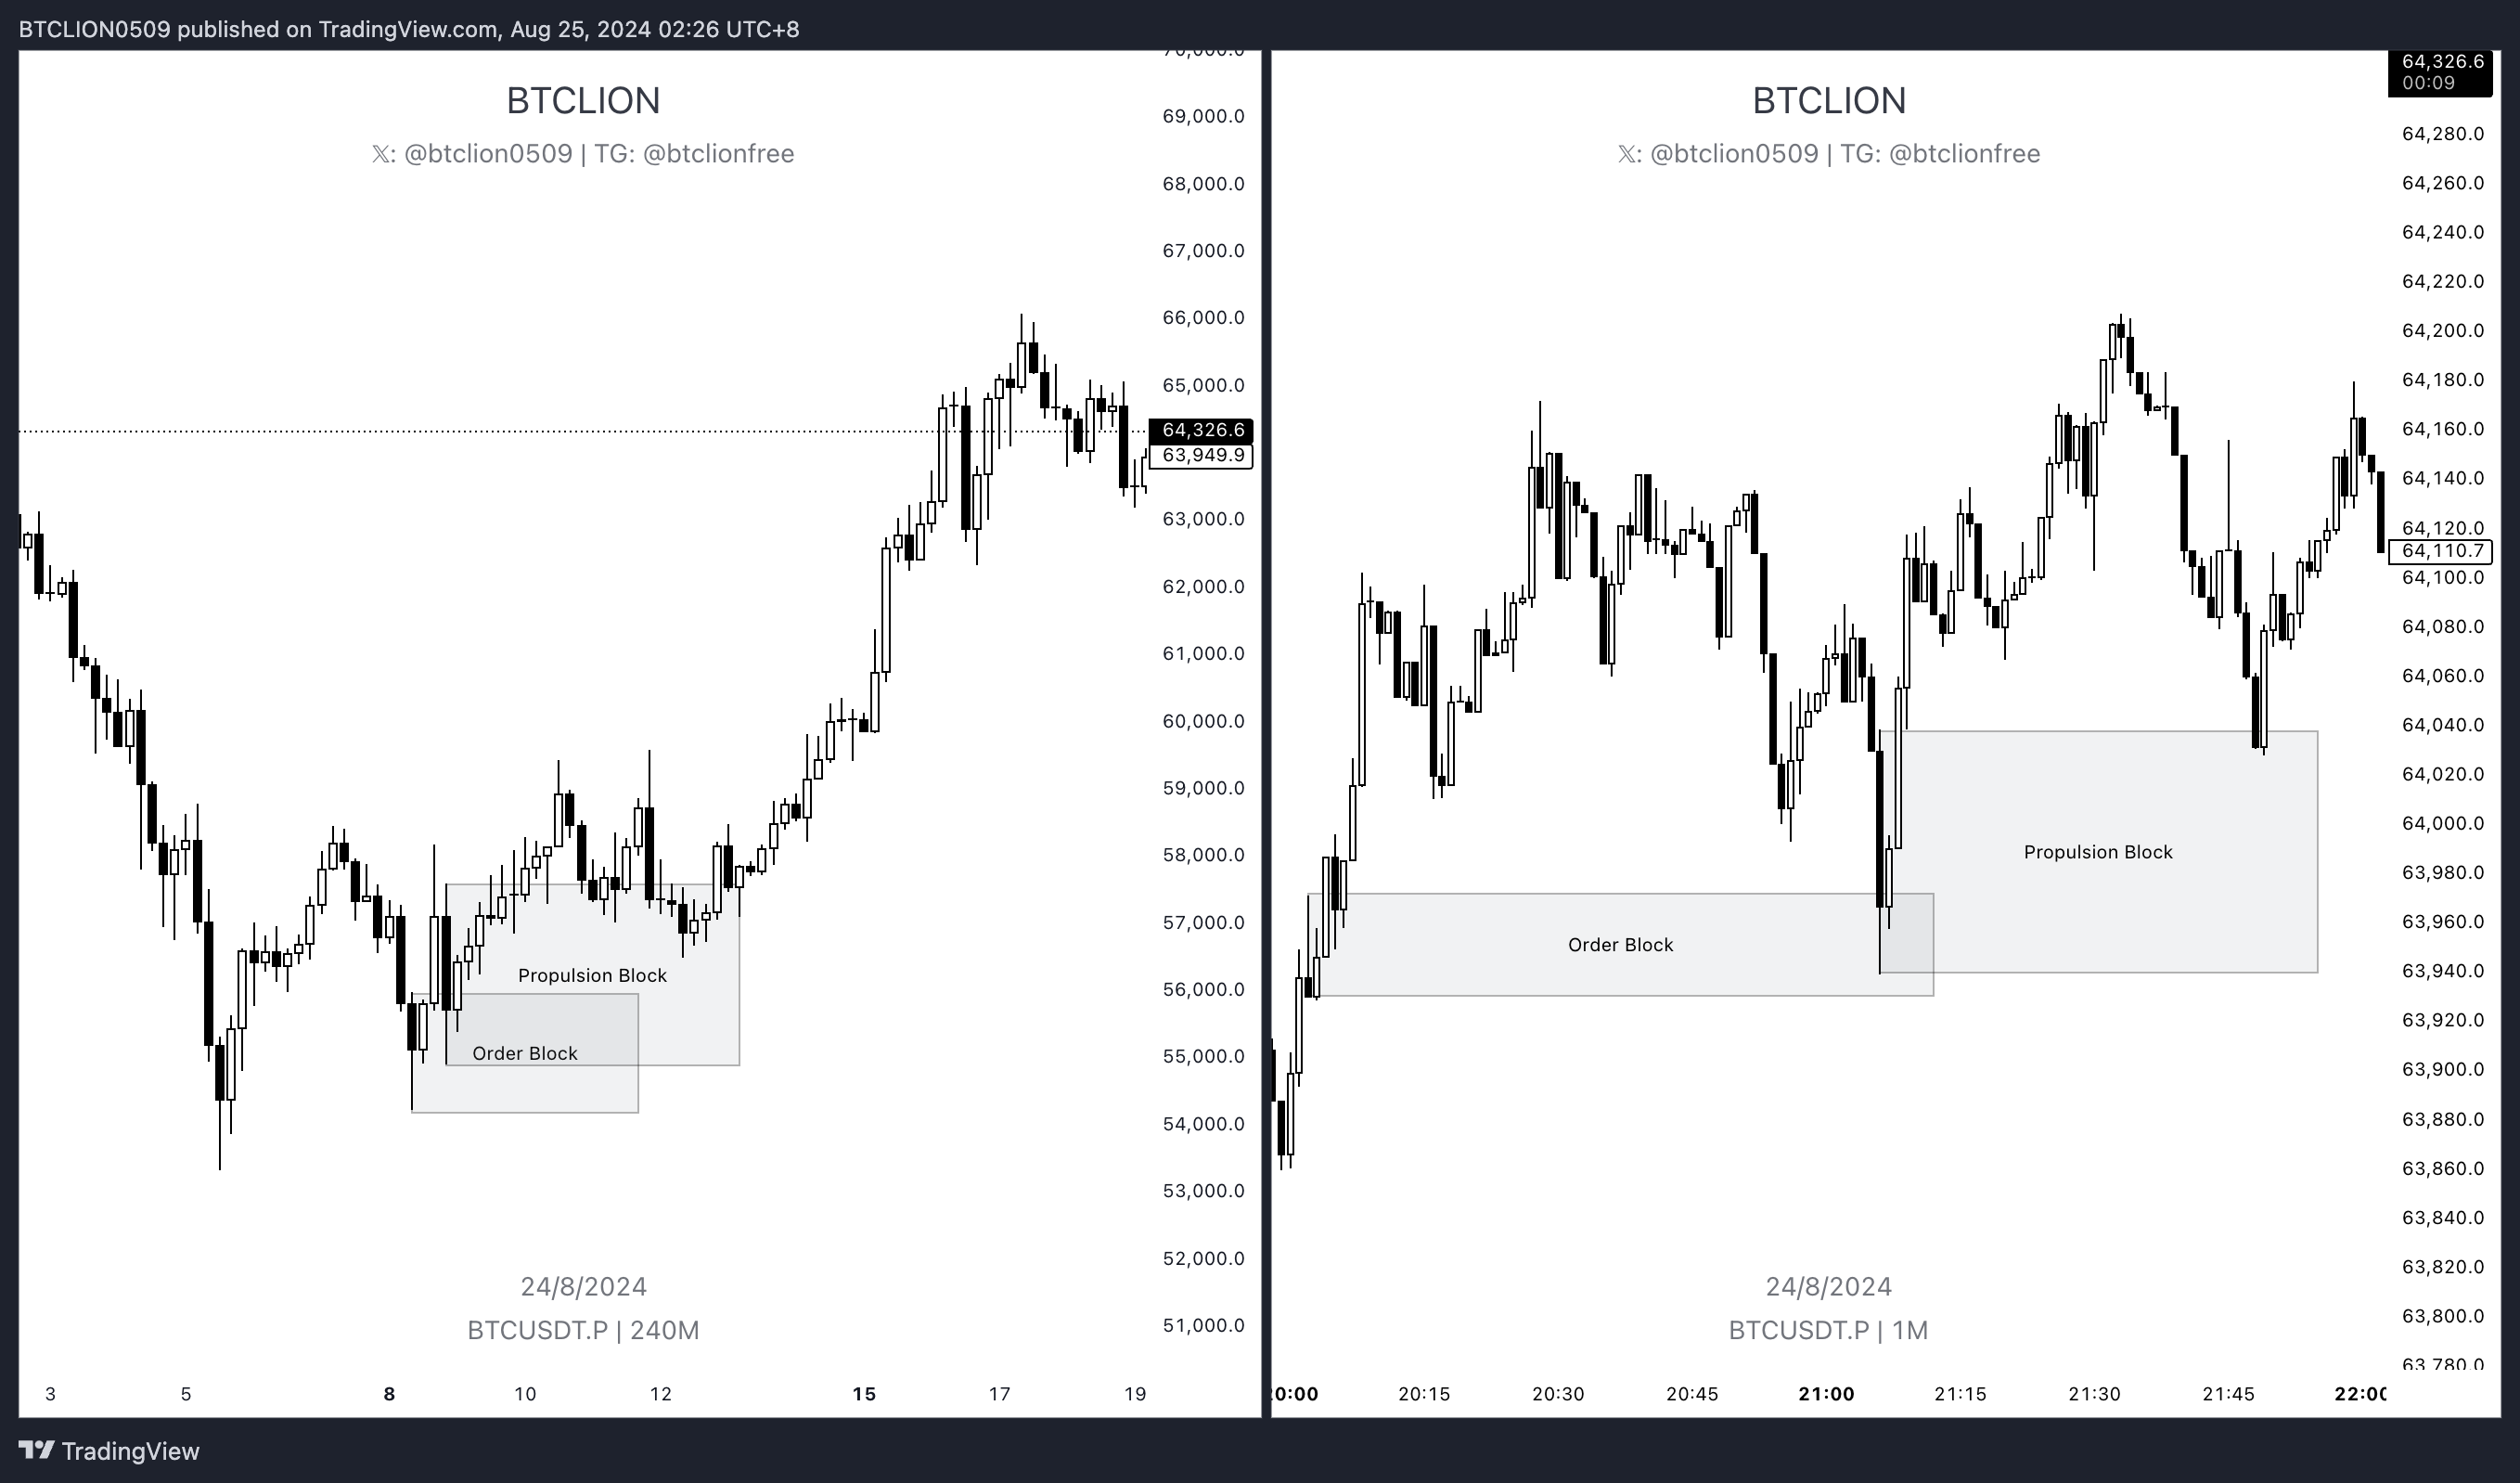
- When price touches a Propulsion Block, it should not break through the PB's MT.
- When price touches a Propulsion Block, it should move away quickly.
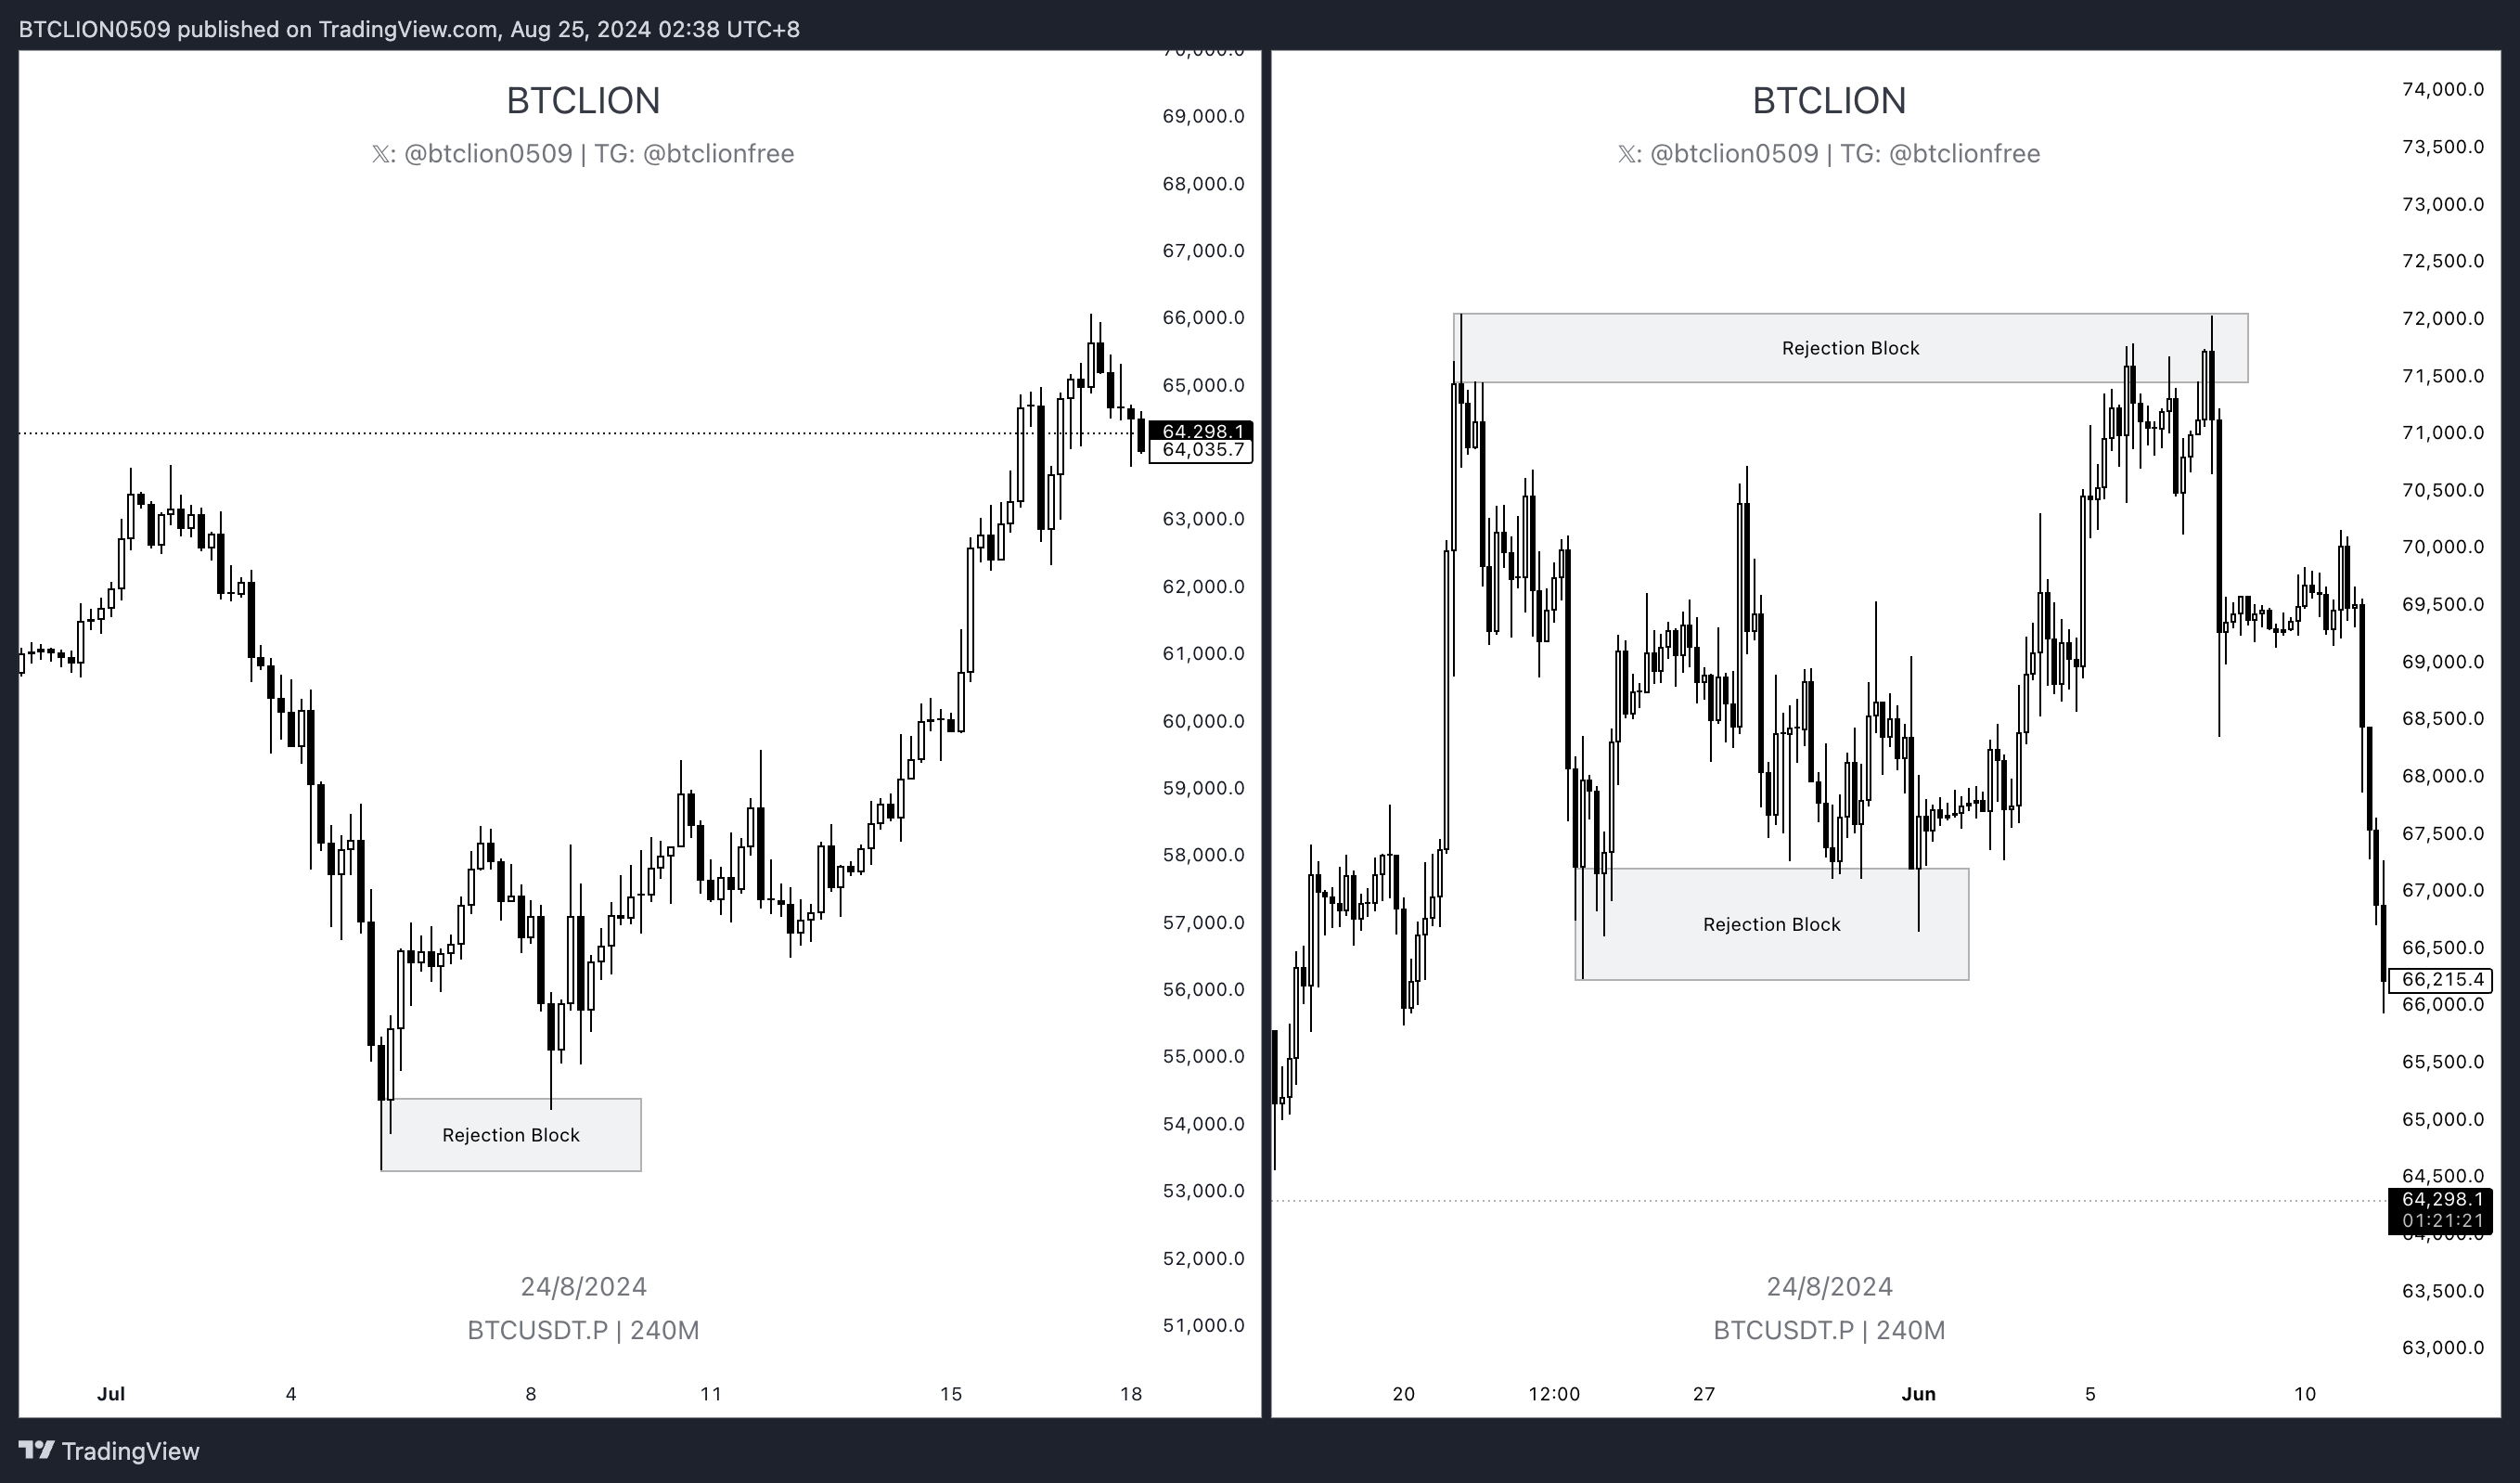
Rejection Block (RB)
When price touches a key level and prints a long wick, we call that behavior Rejection. It shows that price has a strong intention to move away from the area. The wick of that candle is called a Rejection Block.
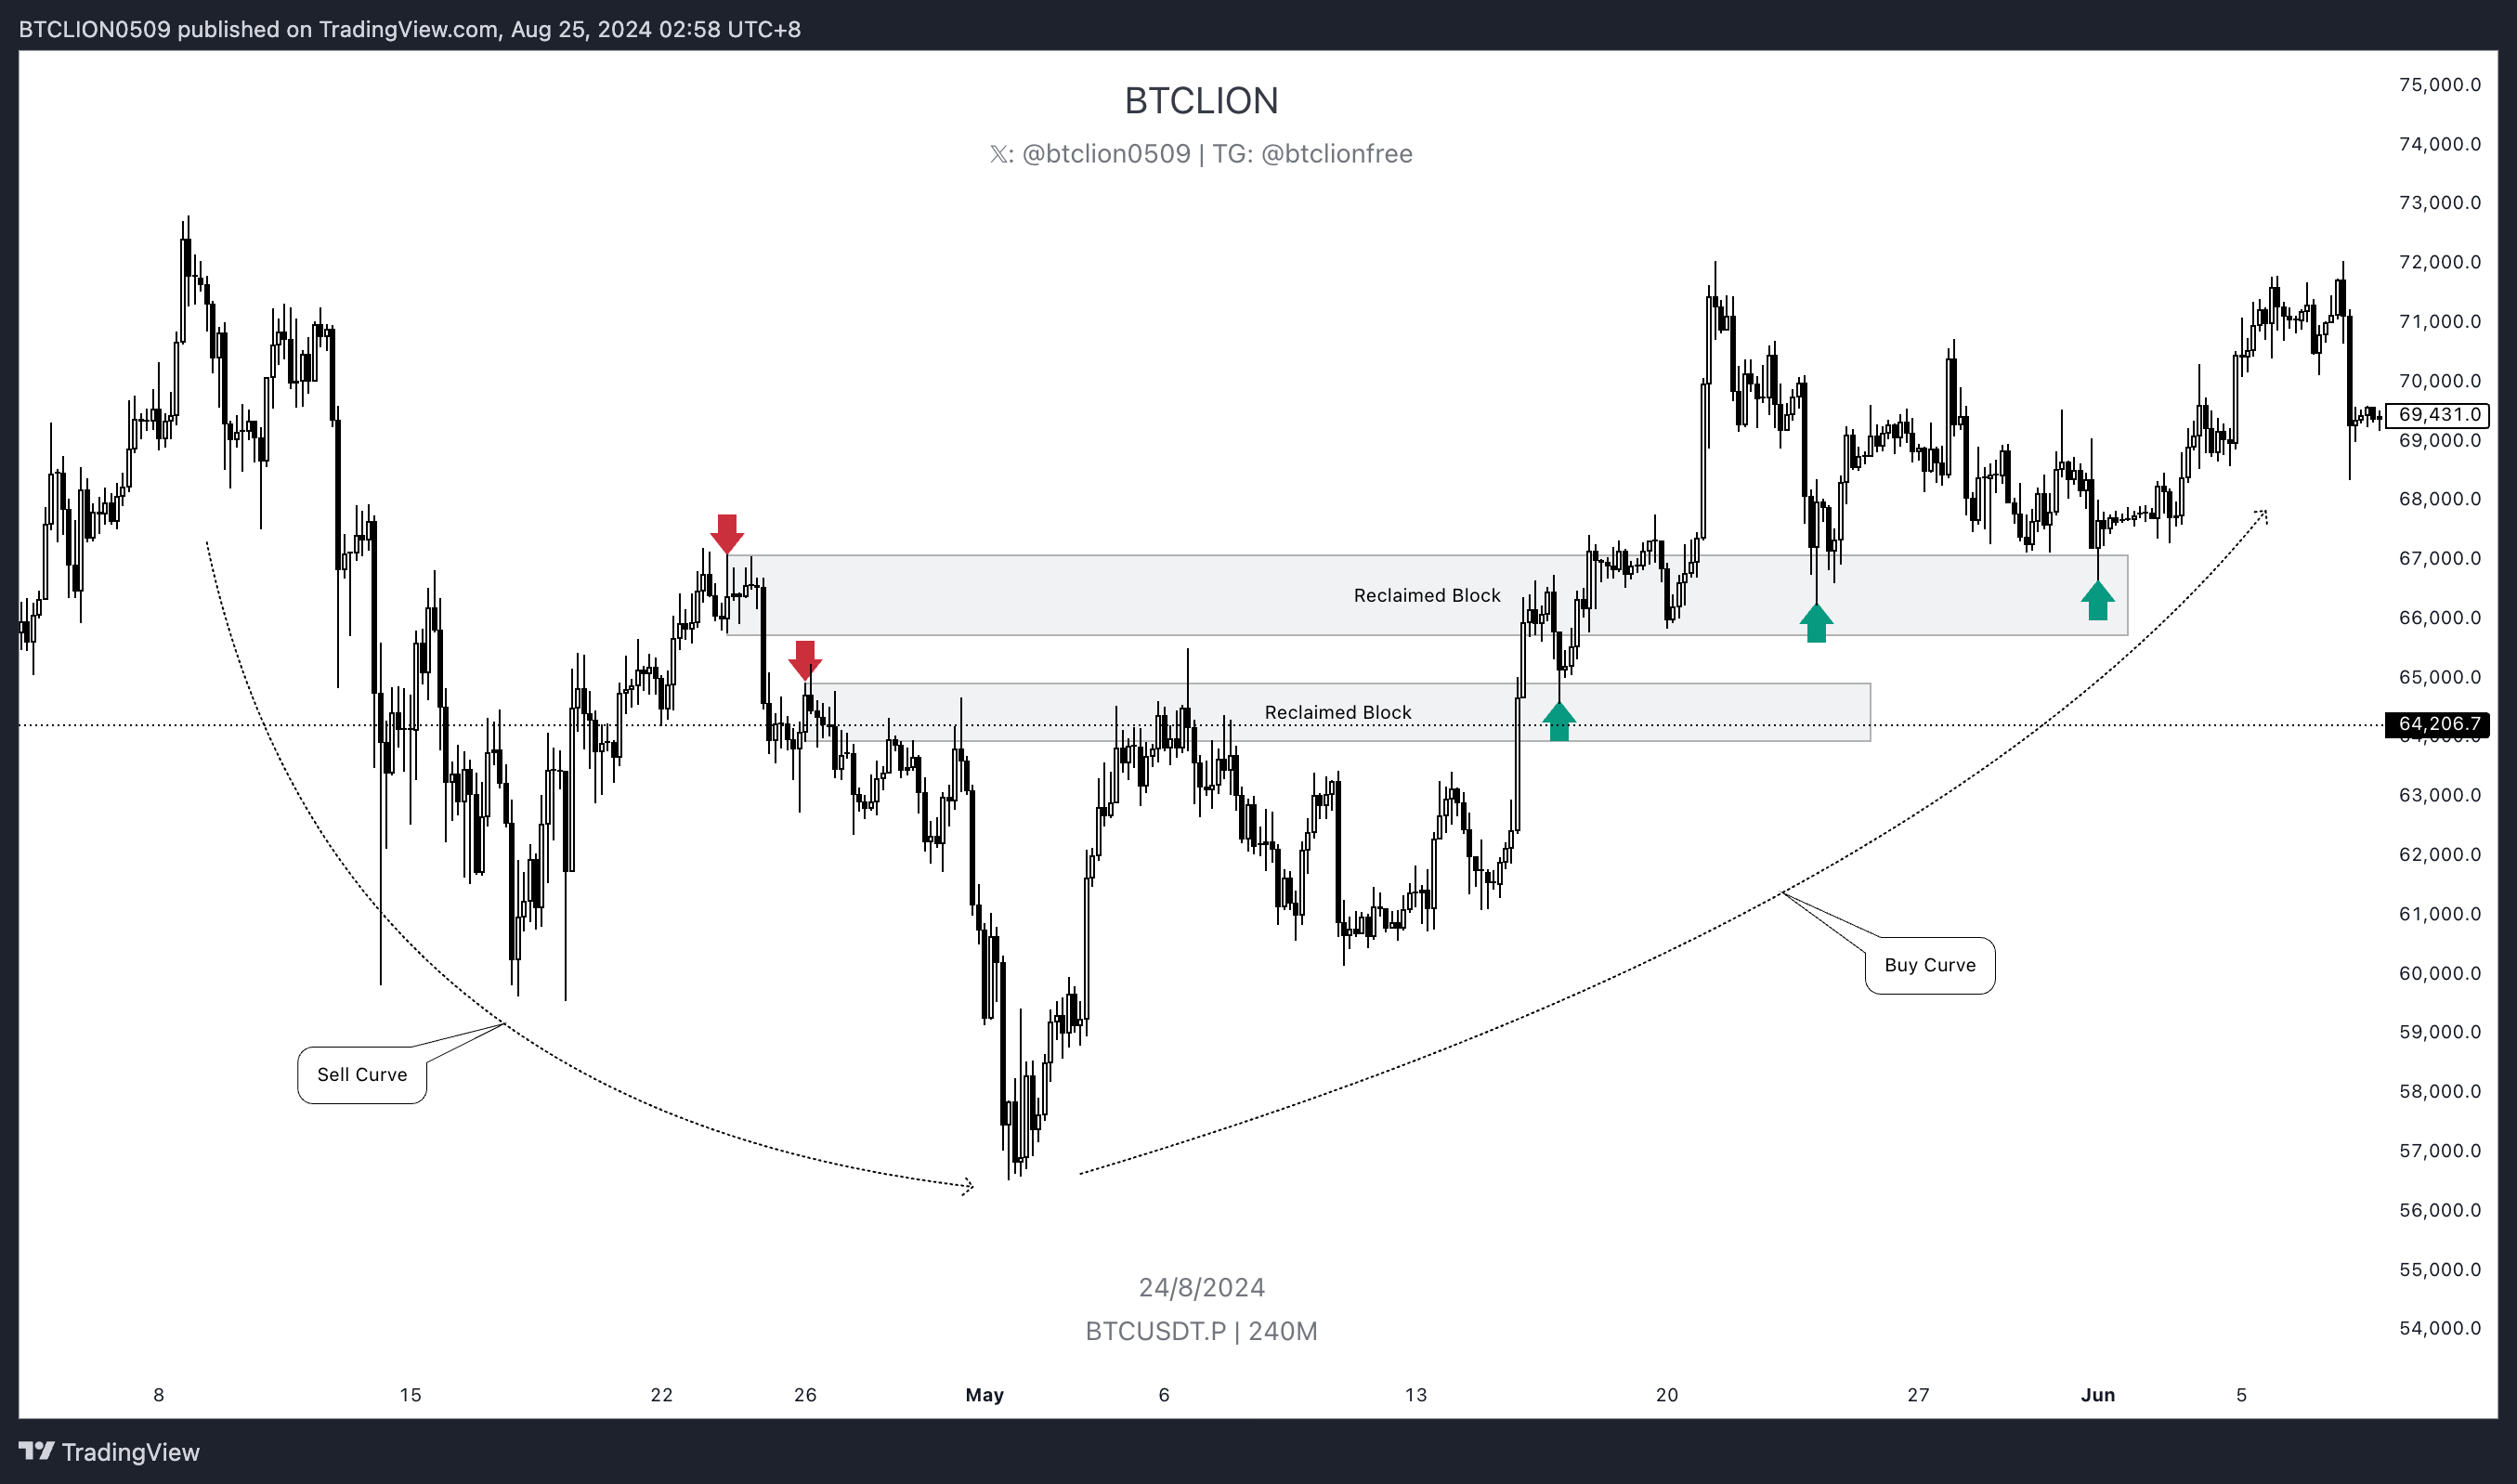
Reclaimed Block
Earlier, we mentioned that order blocks are traces left by Smart Money when it buys or sells in the market. When market structure reverses, an order block that was once used for buying may later be used for selling, and an order block that was once used for selling may later be used for buying. We call this type of order block a Reclaimed Block.
To explain the logic of Reclaimed Block in more depth, we would need to introduce the concept of MMXM, or the Market Maker Model. So if this part feels unclear for now, that is normal. MMXM will be explained in detail later.